Installing MacBook Unibody Fan
Replacing a defective fan will keep your laptop running cool.
Tools used in this guide : Phillips #00 Screwdriver , Spudger
Parts relevant to this guide : MacBook Unibody/MBP 13" Unibody Fan

Step 1 — Access Door
With the case closed, place the Unibody top-side down on a flat surface.
Depress the grooved side of the access door release latch enough to grab the free end. Lift the release latch until it is vertical.

Step 2
The access door should now be raised enough to lift it up and out of the Unibody.
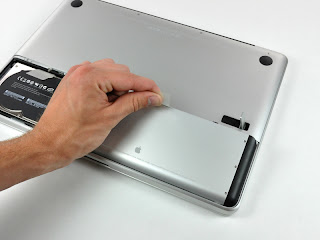
Step 3 — Battery
Be sure the access door release latch is vertical before proceeding.
Grab the white plastic tab and pull the battery up and out of the Unibody.

Step 4 — Lower Case
Remove the following eight screws securing the lower case to the chassis:
One 3 mm Phillips screw.
Three 13.5 mm Phillips screws.
Four 3.5 mm Phillips screws.

Step 5
Using both hands, lift and remove the lower case off the upper case.

Step 6 — Fan
Use a spudger to pry the fan connector straight up off the logic board.

Step 7
Remove the following three screws securing the fan to the upper case:
Two 5 mm Phillips screws.
One 7 mm Phillips screw.

Step 8
Lift the fan out of the upper case.
Congratulations!
To reassemble your device, follow these instructions in reverse order

No comments:
Post a Comment