PLEASE READ THIS FIRST !

Oh no! You've dropped your digital stuff. And it's out of warranty. And repair costs more than the digital stuff is worth. What to do short of tossing the digital stuff (or selling on ebay)? Well, believe it or not the average person has a good chance of diy fixing that digital stuff themselves. All they'll need for most cases is some patience, and a little background knowledge. The intent of the posts on this blog are to help provide that knowledge.

Disclaimer Warning: The following instructions are given without any warranty. They don't have to be complete or correct. Don't do any of the following steps if you're not sure of what you're doing. You could damage your digital stuffs and you WILL lose your warranty. Everything you do will be at your own risk.

Disclaimer Notice : imprtant things to know before you start taking Part your digital stuffs

Showing posts with label Rear. Show all posts

Saturday, September 26, 2009

Installing iPod 4th Generation or Photo Rear Panel

Installing iPod 4th Generation or Photo Rear Panel

Remove your rear panel to access your iPod's internals.

Tools used in this guide : iPod Opening Tools
Parts relevant to this guide : iPod 4G 20 GB Rear Panel , iPod 4G 40 GB Rear Panel

Step 1 — Rear Panel
Before opening your iPod, ensure that the hold switch is in the locked position. The orange bar should be visible, indicating hold is active.


Step 2
Opening the iPod can be challenging. Don't get discouraged if it takes you a few tries before the iPod is opened.

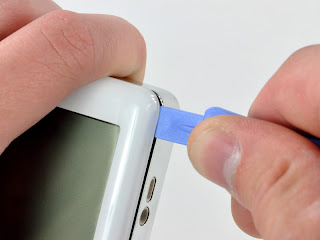
Insert a large iPod opening tool into the seam between the plastic front and metal rear panel of the iPod, near the headphone jack. The tool's edge should point towards the metal rear panel to prevent any accidental scratching of the plastic front.

Run the tool along the top seam toward the upper left corner of the iPod. Press the tool into the corner, creating a small gap on the side of the case.

Step 3
Push the large iPod opening tool into the upper left corner of the iPod, creating a small gap along the side seam.


Step 4
There are five retaining tabs on each side of the iPod.
With the large iPod opening tool still inserted in the top seam, press a small iPod opening tool into the gap you just created.
Run the iPod opening tool down the side seam, releasing all five tabs.
It may be necessary to wiggle the tool while working your way down the seam to free all the


Step 5
Run the iPod opening tool around the lower left corner of the iPod and along the bottom seam to free the two retaining clips near the dock connector.

Step 6
Run the iPod opening tool around the lower right corner and slide it down the right side seam to free the five tabs holding the iPod together. You may be able to free the tabs by gently wiggling the front panel of the iPod.

Step 7
The iPod case is now open, but don't separate the two halves just yet. There is still an orange ribbon cable connecting the headphone jack to the logic board.
Open the case like a book with the dock connector edge at the top, and lay the rear panel next to the front half of the iPod.

Step 8
Use a plastic tool or your fingernails to carefully disconnect the orange headphone jack cable. Be sure to pull straight up on the connector, not the cable itself.

Installing iPod 4th Generation or Photo Rear Panel

Installing iPod 4th Generation or Photo Rear Panel

The shiny rear half or your iPod case.

Tools used in this guide : Phillips #00 Screwdriver , iPod Opening Tools
Parts relevant to this guide : iPod 4G 20 GB Rear Panel , iPod 4G 40 GB Rear Panel

Step 1 — Rear Panel
Before opening your iPod, ensure that the hold switch is in the locked position. The orange bar should be visible, indicating hold is active.


Step 2
Opening the iPod can be challenging. Don't get discouraged if it takes you a few tries before the iPod is opened.

Insert a large iPod opening tool into the seam between the plastic front and metal rear panel of the iPod, near the headphone jack. The tool's edge should point towards the metal rear panel to prevent any accidental scratching of the plastic front.

Run the tool along the top seam toward the upper left corner of the iPod. Press the tool into the corner, creating a small gap on the side of the case.

Step 3
Push the large iPod opening tool into the upper left corner of the iPod, creating a small gap along the side seam.


Step 4
There are five retaining tabs on each side of the iPod.
With the large iPod opening tool still inserted in the top seam, press a small iPod opening tool into the gap you just created.
Run the iPod opening tool down the side seam, releasing all five tabs.
It may be necessary to wiggle the tool while working your way down the seam to free all the


Step 5
Run the iPod opening tool around the lower left corner of the iPod and along the bottom seam to free the two retaining clips near the dock connector.

Step 6
Run the iPod opening tool around the lower right corner and slide it down the right side seam to free the five tabs holding the iPod together. You may be able to free the tabs by gently wiggling the front panel of the iPod.

Step 7
The iPod case is now open, but don't separate the two halves just yet. There is still an orange ribbon cable connecting the headphone jack to the logic board.
Open the case like a book with the dock connector edge at the top, and lay the rear panel next to the front half of the iPod.

Step 8
Use a plastic tool or your fingernails to carefully disconnect the orange headphone jack cable. Be sure to pull straight up on the connector, not the cable itself.

Step 9 — Rear Panel
Remove the 3 silver Philips screws securing the headphone jack to the rear panel.

Step 10
Lift the headphone jack assembly out of the iPod.

Rear panel remains.

Thursday, September 10, 2009

Installing iPod 3rd Generation Rear Panel

Installing iPod 3rd Generation Rear Panel

The shiny rear half or your iPod case.

Tools used in this guide : Phillips #00 Screwdriver , Spudger , iPod Opening Tools
Parts relevant to this guide : iPod 3G Thick Rear Panel , iPod 3G Thin Rear Panel

Step 1 — Case
Before opening your iPod, ensure that the hold switch is in the locked position. The orange bar should be visible, indicating hold is active.


Step 2
Opening the case can be challenging. Do not get discouraged if it takes you a few tries before the iPod is opened.
Insert a large iPod opening tool into the seam between the plastic front and metal rear panel of the iPod, near the headphone jack. The tool's edge should point toward the metal rear panel to prevent any accidental scratching of the plastic front.
Run the tool along the top seam toward the upper left corner of the iPod.

Step 3
Push the large iPod opening tool into the upper left corner of the iPod, creating a small gap along the side seam.

Step 4
There are five retaining tabs on each side of the iPod.
With the large iPod opening tool still inserted in the top seam, press a small iPod opening tool into the gap you just created.
Run the iPod opening tool down the side seam, releasing all five tabs.
It may be necessary to wiggle the tool while working your way down the seam to free all the tabs.


Step 5
Run the iPod opening tool around the lower left corner of the iPod and along the bottom seam to free the two retaining tabs near the dock connector.
Run the tool around the lower right corner of the iPod and along the right side seam to free all five retaining tabs.
The case of the iPod should now easily come loose. Ensure all retaining tabs are free before proceeding.
Step 6
The iPod case is now open, but don't separate the two halves just yet. There is still an orange ribbon cable connecting the headphone jack to the logic board.
Open the case like a book with the dock connector at the top, and lay the rear panel next to the front half of the iPod.

Step 7
Use a plastic tool or your fingernails to carefully disconnect the orange headphone jack cable. Be sure to pull straight up on the connector, not the cable itself.

Step 8 — Headphone Jack
Remove the 3 silver Philips screws securing the headphone jack to the rear panel.

Step 9
Slide a spudger beneath the orange headphone jack cable and use it to pry the cable up from the rear panel.

Step 10
Grasp the headphone jack board and lift it out of the iPod.
When reassembling your iPod, be sure that the plastic hold switch mechanism is synced with the hold switch on the logic board. The switch on the board is a small black nub that sits in the slot on the hold switch mechanism.

Step 11 — Rear Panel
Rear panel remains.

Sunday, August 23, 2009

Installing iPod 1st Generation Rear Panel

Installing iPod 1st Generation Rear Panel

The shiny rear half or your iPod case.

Tools used in this guide : iPod Opening Tools
Parts relevant to this guide : iPod 1G 5 GB Rear Panel

Step 1 — Rear Panel
Before opening your iPod, ensure that the hold switch is in the locked position.

Step 2
Opening the iPod can be challenging. Don't get discouraged if it takes you a few tries before the iPod is opened.
Insert a plastic iPod opening tool in the seam between the white plastic front and metal back of the iPod. Once you've inserted the tool, run it along the seam to free the five tabs holding the iPod together.

Step 3
Continue to run the opening tool along the side of the case until all five tabs have been released.

Step 4
Work around the corner of the iPod and release the two tabs holding the iPod together near the dock connector.

Step 5
Free the five tabs holding the iPod together on the other side. You may be able to free the tabs by gently wiggling the front panel of the iPod.
Lift the rear panel away from the iPod.

Congratulations!
To reassemble your device, follow these instructions in reverse order

Saturday, August 22, 2009

Installing iPod Nano 1st Generation Rear Panel

Installing iPod Nano 1st Generation Rear Panel

The shiny rear half or your iPod case.

Tools used in this guide : iPod Opening Tools
Parts relevant to this guide : iPod Nano Gen 1 Rear Panel

Step 1 — Rear Panel
Before opening your iPod, ensure that the hold switch is in the locked position.

Step 2
The rear panel is secured to the front case by eleven clips permanently attached to the rear panel. These clips lock onto small tabs machined into the front case.

To free the tabs, they must be pushed toward the center of the iPod. Note the location of all tabs on the rear panel. When using an iPod opening tool to free the rear panel, be sure to work the tool at the location of these clips.


Step 3
Opening the iPod can be challenging. Don't get discouraged if it takes you a few tries before the iPod is opened.

Insert the large iPod opening tool into the seam between the front case and rear panel of the iPod, below the dock connector. Run the tool back and forth to create an opening. The tool's edge should point toward the rear panel to prevent any accidental scratching of the aluminum front case.

Step 4
Insert a small iPod opening tool into the seam on the Hold button side of the iPod, with the edge of the tool pointing toward the rear panel.

Step 5
The large iPod opening tool is no longer needed to gain access to the left side of the iPod.

Gently enlarge the existing gap by pressing/wiggling the small iPod opening tool into the gap near each of the the two tabs attached to the rear case, pushing the clips toward the center of the iPod until both have been freed.


Step 6
Repeat the same procedure listed in the previous step to free the five clips along the headphone jack side of the iPod.

Step 7
After ensuring all tabs are free, separate the two halves of the iPod.

The rear panel is now free from the iPod.

Congratulations!
To reassemble your device, follow these instructions in reverse order.