Nokia 7900 Prism disassembly
Tools required: Torx 5 screwdriver, plastic tool such as a guitar plectrum or credit card.
Remove your back cover, battery, sim and memory card. Now remove the six black screws you can see (three on each side of the phone).
 The front cover can now be removed. Lift from left to right as the cover will still be connected by a wire on the right hand side, which you don't want to damage.
 Your phone should now look like below. Remove the five screws you can see around the LCD screen .
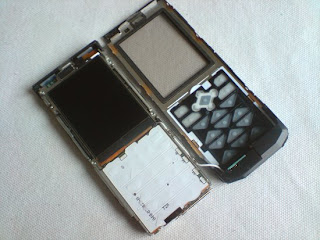 You can now lift the screen away from the phone. It will still be connected by a ribbon connector, circled. This attaches like a plug and socket. Simply lift it up, away from the phone, to unplug the connector.
 You should now have the LCD screen removed from the phone. You now need to lever the screen from its metal frame. Use something like a credit card or guitar plectrum to do this. The LCD screen will be stuck in the frame with double sided tape so the best way to remove it is to slide your credit card under the screen.
 You should now have the LCD screen removed. Reverse the whole procedure for reassembly.

Tools required: Torx 5 screwdriver, plastic tool such as a guitar plectrum or credit card.
Remove your back cover, battery, sim and memory card. Now remove the six black screws you can see (three on each side of the phone).
The front cover can now be removed. Lift from left to right as the cover will still be connected by a wire on the right hand side, which you don't want to damage. Your phone should now look like below. Remove the five screws you can see around the LCD screen .
 You can now lift the screen away from the phone. It will still be connected by a ribbon connector, circled. This attaches like a plug and socket. Simply lift it up, away from the phone, to unplug the connector.
 You should now have the LCD screen removed from the phone. You now need to lever the screen from its metal frame. Use something like a credit card or guitar plectrum to do this. The LCD screen will be stuck in the frame with double sided tape so the best way to remove it is to slide your credit card under the screen.
 You should now have the LCD screen removed. Reverse the whole procedure for reassembly.


