Installing iPod 1st Generation Display
Replace a cracked or faulty display.
Tools used in this guide : Spudger , T6 Torx Screwdriver , iPod Opening Tools
Parts relevant to this guide : iPod 1G Display

Step 1 — Rear Panel
Before opening your iPod, ensure that the hold switch is in the locked position.

Step 2
Opening the iPod can be challenging. Don't get discouraged if it takes you a few tries before the iPod is opened.
Insert a plastic iPod opening tool in the seam between the white plastic front and metal back of the iPod. Once you've inserted the tool, run it along the seam to free the five tabs holding the iPod together.

Step 3
Continue to run the opening tool along the side of the case until all five tabs have been released.

Step 4
Work around the corner of the iPod and release the two tabs holding the iPod together near the dock connector.

Step 5
Free the five tabs holding the iPod together on the other side. You may be able to free the tabs by gently wiggling the front panel of the iPod.
Lift the rear panel away from the iPod.

Step 6 — Battery
Lift the battery up from the adhesive holding it to the iPod.
Lay the battery next to the iPod (it is still connected to the logic board).

Step 7
Carefully disconnect the orange ribbon cable from the hard drive.
If the cable doesn't come free easily, it may be helpful to gently wiggle the cable from side to side.
Lift the hard drive out of the iPod.

Step 8 — Display
Carefully disconnect the white battery connector from the logic board. Be sure to pull only on the connector itself and not on the cables.

Step 9
Peel up the gray rubber bumper near the hard drive ribbon to reveal the T6 Torx screw beneath.
Remove the newly revealed T6 Torx screw.

Step 10
Remove the 3 remaining T6 Torx screws from the logic board.

Step 11
Slide the logic board away from the port end of the casing and lift it out of the iPod.

Step 12
Note the location of the four white plastic tabs securing the display to the logic board. These tabs must be released before the display can be removed.

Step 13
Use a spudger or your finger to free the four white plastic tabs indicated in the previous picture.
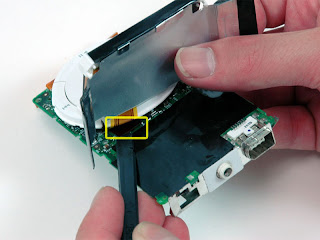
Step 14
Use a spudger to carefully disconnect the display ribbon cable from beneath the scroll wheel.
Congratulations!
To reassemble your device, follow these instructions in reverse order

No comments:
Post a Comment